Hello, Azure enthusiasts! 👋 Ready to dive into the world of cloud computing by creating your first Azure Virtual Machine (VM)? In this comprehensive guide, we’ll walk you through every detail, ensuring a smooth experience while avoiding common pitfalls that could lead to unexpected charges. We’ll also include informative Sankey, State, and Sequence diagrams to illustrate key concepts. Let’s get started! 🎯
Introduction to Azure Virtual Machines 🧐
Azure Virtual Machines are on-demand, scalable computing resources offered by Microsoft Azure. They provide the flexibility of virtualization without the need to buy and maintain physical hardware. With Azure VMs, you can deploy a wide range of operating systems and software configurations.
Azure Virtual Machines Overview | Microsoft Docs
Prerequisites ✅
- An Azure account. If you don’t have one, you can create a free account with $200 credit.
Create Your Azure Free Account Today | Microsoft Azure
- Azure Portal access.
- Basic understanding of virtual machines and cloud concepts.
Step 1: Log into the Azure Portal 🔑
- Navigate to the Azure Portal and sign in with your Azure account credentials.

Azure Portal sign-in page.
Step 2: Navigate to Virtual Machines 🗂️
- In the Azure Portal dashboard, click on “Virtual Machines” on the left-hand menu. If it’s not visible, use the search bar at the top.

Azure Portal dashboard with “Virtual Machines” highlighted.
Step 3: Create a New Virtual Machine 🆕
- Click on the “Create” button and select “Azure Virtual Machine”.

After clicking the “Create” button for a new Azure Virtual Machine.
Step 4: Configure Basic Settings ⚙️
a. Subscription and Resource Group
- Subscription: Choose your subscription. If you’re using a free account, select “Free Trial”.
- Resource Group: Click “Create new” and name it something like “MyFirstResourceGroup”.
b. Instance Details
- Virtual Machine Name: Enter a unique name, e.g., “MyFirstVM”.
- Region: Select a region close to you to reduce latency and potential costs.
- Availability Options: Leave as “No infrastructure redundancy required” for this tutorial.
c. Image
- Choose an operating system. For example, “Windows Server 2019 Datacenter” or “Ubuntu 20.04 LTS”.


d. Size
- Click “See all sizes” and select a size within the Free Tier or one that fits your budget. Avoid selecting high-cost options.
Warning: Choosing larger VM sizes can incur significant charges. Stick to sizes like B1S, which are included in the Free Tier.
e. Administrator Account
- Authentication Type: Choose “Password”.
- Username: Enter a username, e.g., “azureuser”.
- Password: Create a strong password.
f. Inbound Port Rules
- Public Inbound Ports: Select “Allow selected ports”.
- Select Inbound Ports: For Windows, select RDP (3389); for Linux, select SSH (22).

Quickstart: Create a Windows VM | Microsoft Docs
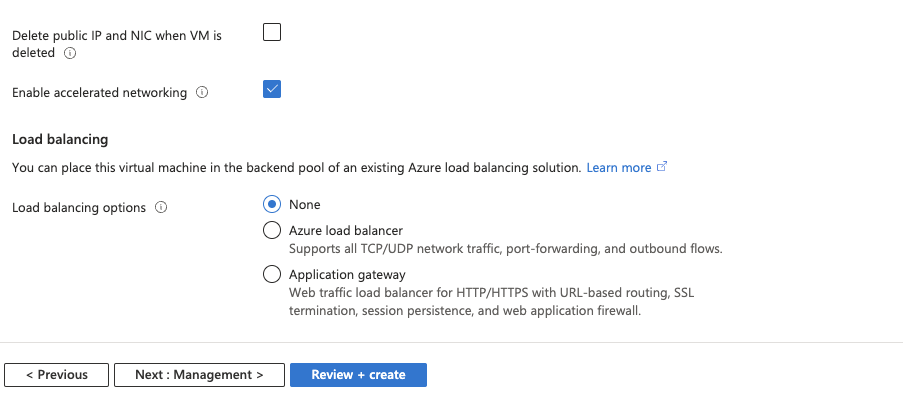
Step 5: Configure Networking 🌐
- Virtual Network: The portal will create one by default. You can leave it as is.
- Subnet: Default subnet is acceptable.
- Public IP: A new public IP will be created.
- NIC Network Security Group: Leave as “Basic”.
Screenshots of VM creation process from Azure portal


Step 6: Management, Advanced, and Tags 🏷️
- Management: You can disable boot diagnostics to avoid storage costs.
- Advanced: Leave default settings.
- Tags: Optionally, add tags for resource management.


State Diagram – VM creation

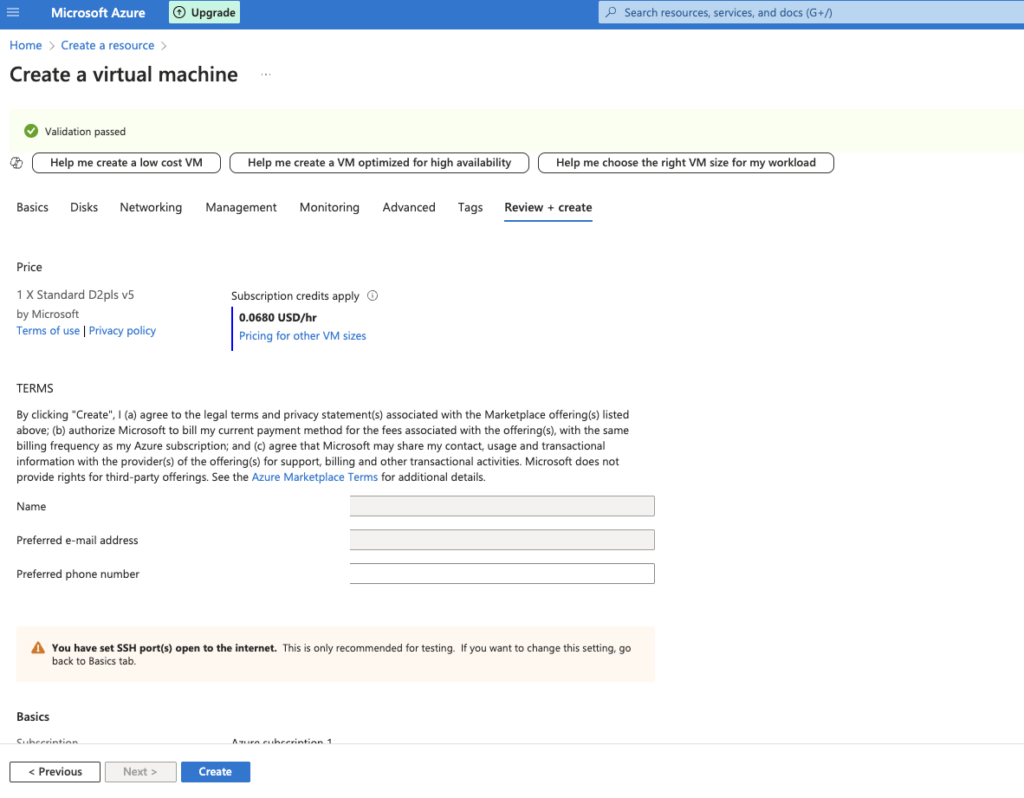
Step 7: Review + Create ✅
- Click on “Review + create”.
- The portal will validate your configurations.
- Ensure that the estimated cost aligns with your expectations.

Step 8: Deploy the VM 🚀
- Click on “Create” to start the deployment.
- Deployment will take a few minutes.


%% Sequence Diagram: Resource Allocation Flow Including Resource Group Creation
sequenceDiagram
    autonumber
    participant User
    participant AzurePortal as Azure Portal
    participant ResourceGroup as Resource Group
    participant VM as Virtual Machine
    participant VNet as Virtual Network
    participant Subnet as Subnet
    participant NSG as Network Security Group
    participant PublicIP as Public IP

    User->>AzurePortal: Starts VM creation
    AzurePortal->>User: Prompts for resource group
    User->>AzurePortal: Creates Resource Group
    AzurePortal->>ResourceGroup: Resource Group created
    AzurePortal->>VM: Configures VM settings
    VM->>VNet: Associates with Virtual Network
    VNet->>Subnet: Assigns Subnet
    VM->>NSG: Applies Network Security Group
    VM->>PublicIP: Assigns Public IP
    AzurePortal->>User: Displays VM deployment progress
     Note right of User: © 2024 Towardscloud Inc.
Sequence diagram showing the flow of resource allocation from Azure Portal to various network components.
Step 9: Connect to Your VM 🔌
For Windows VM:
- Click on “Go to resource”.
- Click on “Connect” > “RDP”.
- Download the RDP file and open it.
- Enter your credentials when prompted.
For Linux VM:
- Use an SSH client like PuTTY or Terminal.
- Connect using the public IP and port 22.


Avoiding Common Pitfalls ⚠️
- Selecting High-Cost VM Sizes: Always choose a VM size within your budget. The B1S size is often sufficient for testing.
- Leaving VMs Running: Stop or deallocate VMs when not in use to prevent charges.
- Data Transfer Costs: Be mindful of outbound data transfers, which can incur costs.
- Unused Resources: Delete resources like disks, network interfaces, and public IPs when they are no longer needed.
Creating a VM Using Azure Cloud Shell 🖥️🔧
Setting Up Azure Cloud Shell 🛠️
- Access Cloud Shell:
- Click on the Cloud Shell icon
- Choose Shell Type:
- Select Bash or PowerShell. For this guide, we’ll use Bash.
- Storage Setup:
- If prompted, create a storage account. This is required to persist files.

State Diagram: VM Lifecycle States
%% State Diagram: Azure VM Lifecycle States
stateDiagram
    %% Define the class definitions
    classDef blue fill:#5479f7,stroke:#000,color:#fff
    classDef purple fill:#B088D4,stroke:#000,color:#fff
    classDef yellow fill:#fcc64d,stroke:#000,color:#000

    %% Define the states and transitions
    [*] --> Deallocated
    Deallocated --> Starting : Start VM
    Starting --> Running : VM Started
    Running --> Stopping : Stop VM
    Stopping --> Stopped : VM Stopped
    Stopped --> Deallocating : Deallocate VM
    Deallocating --> Deallocated : VM Deallocated
    Deallocated --> [*] : Delete VM

    %% Assign classes to states
    state Deallocated,Deallocating:::blue
    state Starting,Stopping:::yellow
    state Running,Stopped:::purple
[*] Copyright©2024TowardscloudInc.
Step-by-Step Commands 📝
Step 1: Set Variables
# Define variables
RESOURCE_GROUP="MyFirstResourceGroup"
VM_NAME="MyFirstVM"
LOCATION="eastus"
IMAGE="UbuntuLTS"
ADMIN_USERNAME="azureuser"
Explanation: This command creates a resource group, a logical container for your resources.
Step 2: Create a Resource Group
az group create --name $RESOURCE_GROUP --location $LOCATION
Step 3: Create the Virtual Machine
az vm create
  --resource-group $RESOURCE_GROUP
  --name $VM_NAME
  --image $IMAGE
  --admin-username $ADMIN_USERNAME
  --generate-ssh-keys
  --size Standard_B1s
Explanation: This command creates a VM with the specified parameters. The --generate-ssh-keys option creates SSH keys for authentication.
Step 4: Open Port 22 for SSH Access
az vm open-port --port 22 --resource-group $RESOURCE_GROUP --name $VM_NAME
Explanation: Allows inbound traffic on port 22 for SSH.
Step 5: Connect to the VM
Obtain the public IP:
az vm list-ip-addresses --resource-group $RESOURCE_GROUP --name $VM_NAME --output table
Connect via SSH:
ssh azureuser@<Public_IP>
Understanding Cloud Shell Command Execution Flow 🌐
Sequence Diagram: Cloud Shell Command Execution Flow

Flow of commands from the user through Azure Cloud Shell to Azure APIs and back with confirmation.
Conclusion 🎉
Congratulations! You’ve successfully created your first Azure Virtual Machine using both the Azure Portal and Azure Cloud Shell. By following this guide, you’ve learned how to:
- Navigate the Azure Portal and configure VM settings.
- Use Azure Cloud Shell and execute commands to create resources.
- Avoid common mistakes that could lead to unexpected charges.
Remember to deallocate or delete your VM when you’re done to prevent any charges. Happy cloud computing! ☁️
Additional Resources
- Quickstart: Create a Linux VM | Microsoft Docs
- Create a Windows VM with Azure CLI | Microsoft Docs
- Tutorial: Manage VMs with Azure CLI | Microsoft Docs
- Overview of Azure Cloud Shell | Microsoft Docs
Need help or have questions? Feel free to reach out in the comments below. We’re here to help you on your Azure journey! 🚀
Disclaimer: This blog is for educational purposes. Always refer to the official Microsoft Azure documentation for the most up-to-date information.
Appendices 🗂️
Deleting Resources to Avoid Charges 🗑️
State Diagram: Resource Deletion Process
%% State Diagram: Resource Deletion Process
stateDiagram
    [*] --> ActiveResources
    [*] Copyright©2024TowardscloudInc.
    ActiveResources --> DeallocateVM : Stop VM
    DeallocateVM --> DeleteResources : Delete VM and associated resources
    DeleteResources --> [*]
State diagram showing the process of deallocating and deleting resources to avoid charges.
Delete the VM:
az vm delete --resource-group $RESOURCE_GROUP --name $VM_NAME --yes
Delete the Resource Group (This deletes all resources within it):
az group delete --name $RESOURCE_GROUP --yes --no-wait
Warning: Deleting the resource group is irreversible. Ensure you no longer need any resources within it.
Happy Computing! 😊